Equine Vet Truck Setup: How to Choose and Organise Your Ambulatory Vehicle
For an ambulatory veterinarian, the vehicle is much more than transport. It is your pharmacy, equipment store, office, workbench and lunchroom. On some days, it feels as though it is the only part of the practice you see.
A good equine vet truck setup should make it easier to find what you need, protect medications and diagnostic equipment, separate clean supplies from contaminated gear and reduce the small frustrations that accumulate over a long day on the road.
I have worked from hatchbacks, SUVs, utes, pickups and vans. I have also seen vehicle fit-outs in mixed and equine practices across Australia and overseas. Some were beautifully organised. Others had expensive equipment squeezed onto back seats and drawers that opened on every corner.
This guide brings together the most useful lessons I have learned. It will not tell you that every equine vet needs the same vehicle. It will help you make deliberate decisions about the vehicle and fit-out that suit your caseload, geography, equipment and working style.
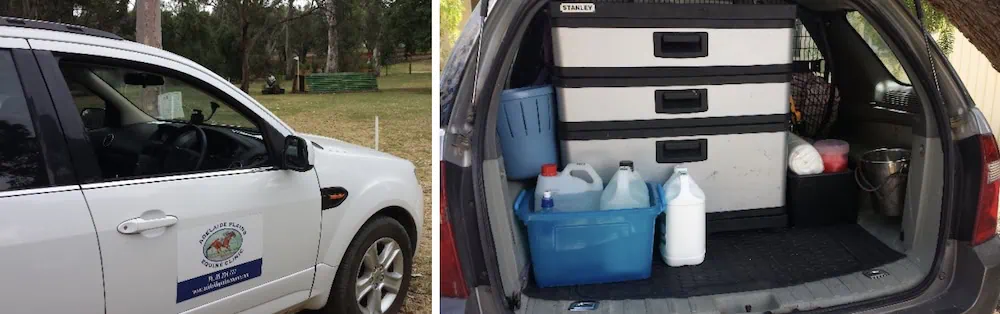
SUV’s have become one of the most popular large animal veterinary vehicles in recent times, as they offer the
convenience of a family vehicle. However, they are often tight on veterinary space, with little room for anything more than
drawers in the back, meaning all the large gear (xrays, etc.) end up on the back seat taking up room.Screenshot
Start With the Work, Not the Vehicle
It is tempting to begin with a preferred make or model. Start instead by defining what the vehicle must do.
Before comparing vehicles, ask:
- What proportion of my work is equine, production animal or mixed practice?
- Which diagnostic equipment must travel with me every day?
- Do I need room for radiography, ultrasonography, endoscopy or dental equipment?
- How often will I travel on rough roads, wet paddocks or steep properties?
- Will I tow a trailer or portable stocks?
- Do I need a second seat for a student, technician, assistant or colleague?
- Will the vehicle also be used by my family?
- How far will I drive each week, and how important are comfort and fuel economy?
- What temperatures will medications and equipment face throughout the year?
- How will I manage clean, dirty, sharp and controlled items separately?
Create a list of what you genuinely carry, not what you imagine might be useful one day. Measure the largest items. Weigh the major equipment where possible, and account for water, fuel, passengers, drawer systems and a trailer’s tow-ball load. Any proposed fit-out should stay within the vehicle manufacturer’s payload, axle and towing limits.
This planning stage is less exciting than choosing a new truck, but it prevents an expensive vehicle from becoming an awkward mobile storeroom.
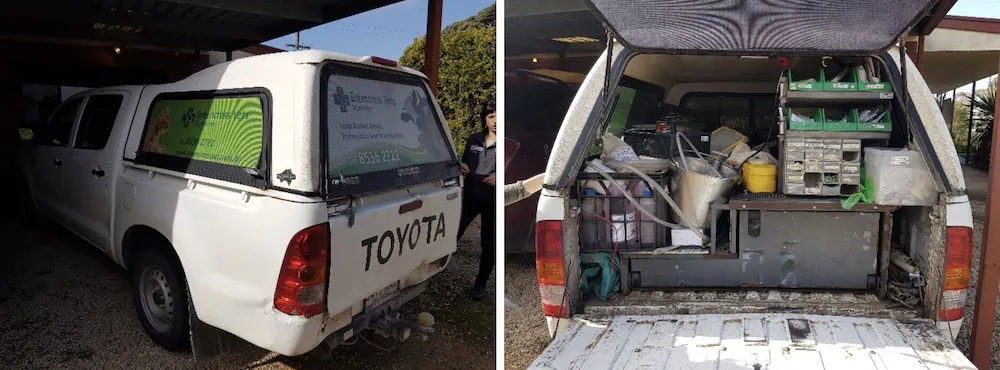
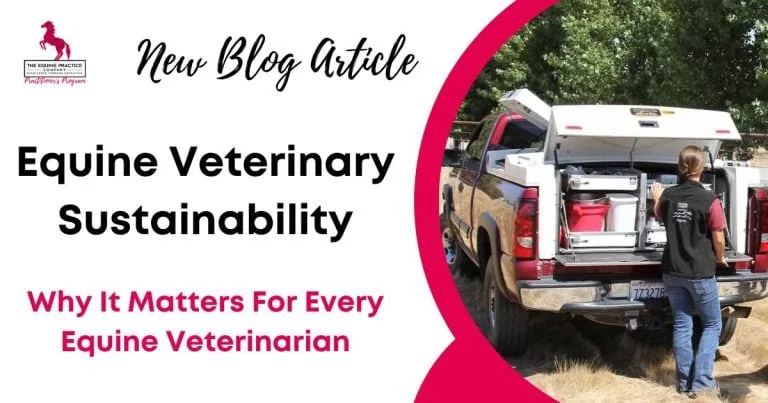
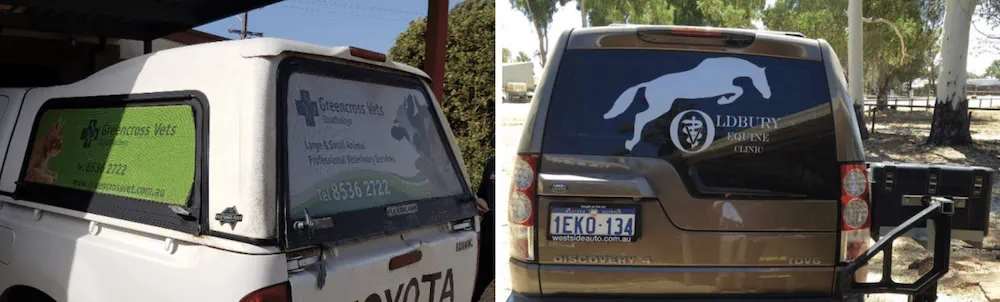
Utes with canopies are a common sight in production animal practices. The quickest and easiest to set up, the
back can be a logistical challenge as the tray sides block access to a large portion of the space. The compensating long-
drawer often has issues with the slider as it gets overfilled with supplies.
Which Vehicle Is Best for an Equine or Large Animal Vet?
There is no universal winner. The best large animal veterinary vehicle is the one that provides safe access to the required equipment without making every kilometre uncomfortable or unnecessarily expensive.
SUV
SUVs are popular because they are comfortable, relatively easy to drive and can often serve as both a work and personal vehicle. A rear hatch also provides some protection from sun and rain while you are working.
The main limitation is space. Once a drawer unit is installed, larger equipment tends to migrate to the back seat. Clean supplies, dirty equipment and temperature-sensitive medications can become difficult to separate. An SUV can work very well for a clinician with a carefully controlled inventory, but it rewards discipline.
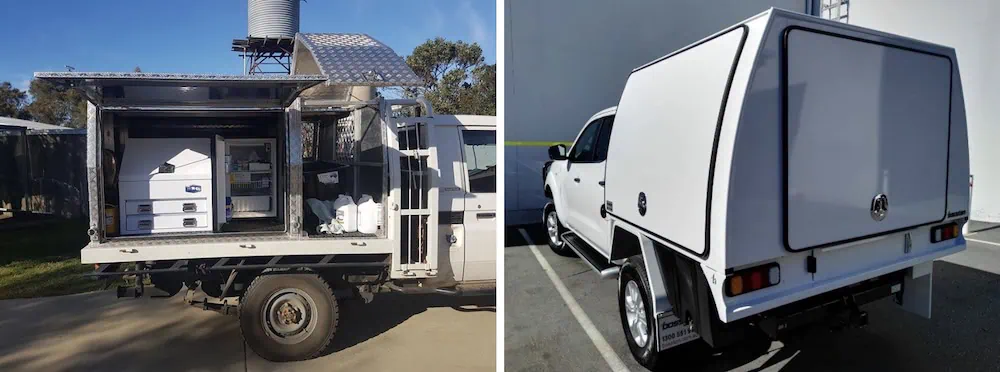
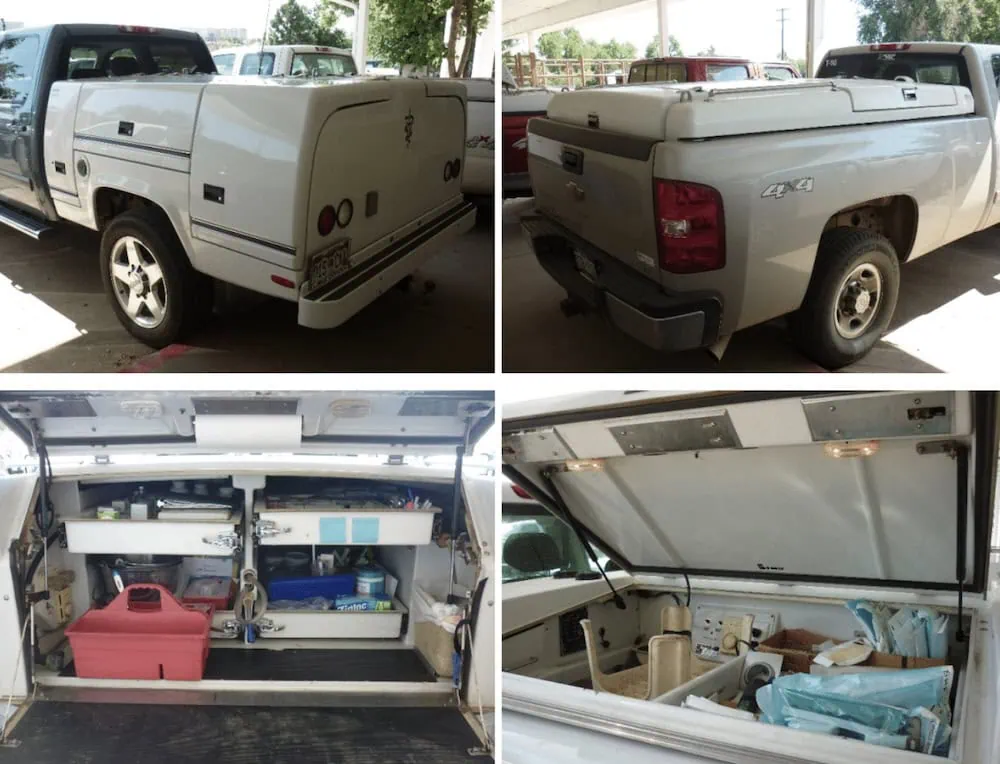
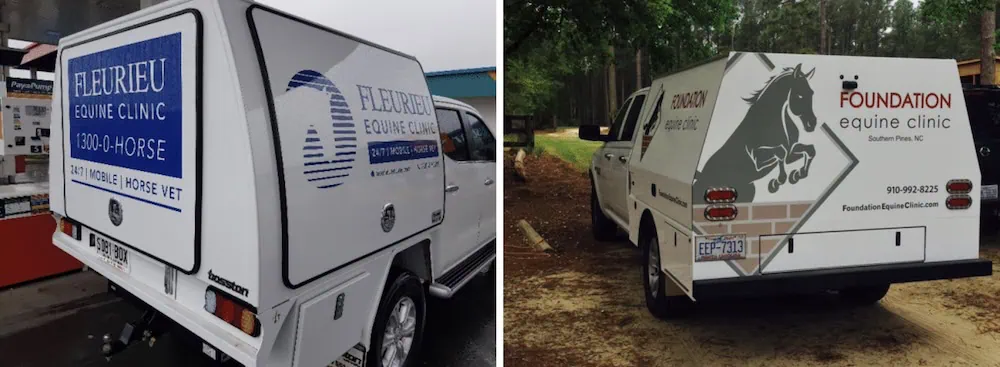
Utes are another common large animal vehicle. 4WD for all farm conditions, a dual cab also offers the benefits
needed for a family vehicle. A custom box makes them the ultimate vet truck. All the space you could need, optional extras
can make it a fully portable clinic. They are secure, and can make a great travelling billboard.
Ute or pickup with a canopy
A four-wheel-drive ute or pickup offers ground clearance, towing capacity and more separation between the cabin and clinical supplies. A standard canopy is one of the quicker and less complex ways to create an ambulatory veterinary vehicle.
The factory tray can limit side access, however, and deep spaces are easily wasted. Long drawers appear to solve the problem but become heavy when overfilled and can be difficult to use on uneven ground. If you choose this arrangement, plan access from the sides and rear before deciding where every drawer will go.
Ute or pickup with a custom veterinary box
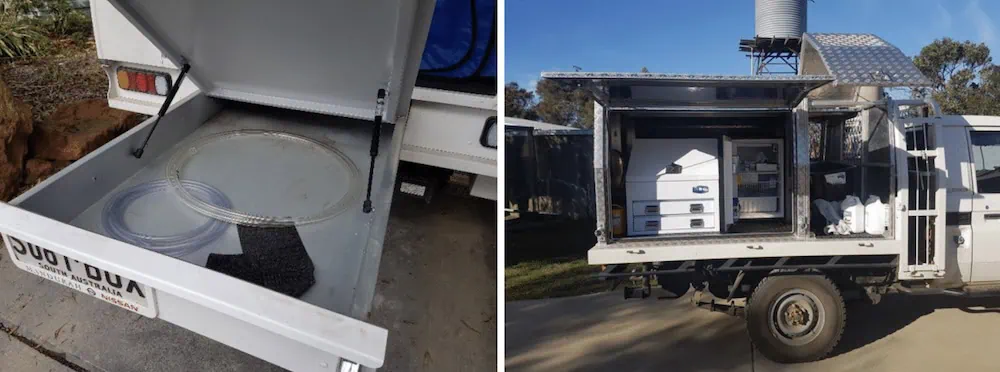
A purpose-built service body or veterinary box provides the greatest opportunity to design around the work. It can include short drawers, external compartments, a refrigerator, water, power, lighting, radiography storage, dirty-equipment areas and pull-out work surfaces.
It is usually the most expensive option to build, but a well-designed box may be transferable when the vehicle is replaced. For a busy equine or mixed practice, this can be a better long-term investment than repeatedly adapting generic storage.
As with every significant practice expense, the cost of the vehicle, fit-out, fuel, insurance and maintenance should ultimately be reflected in your equine practice pricing.
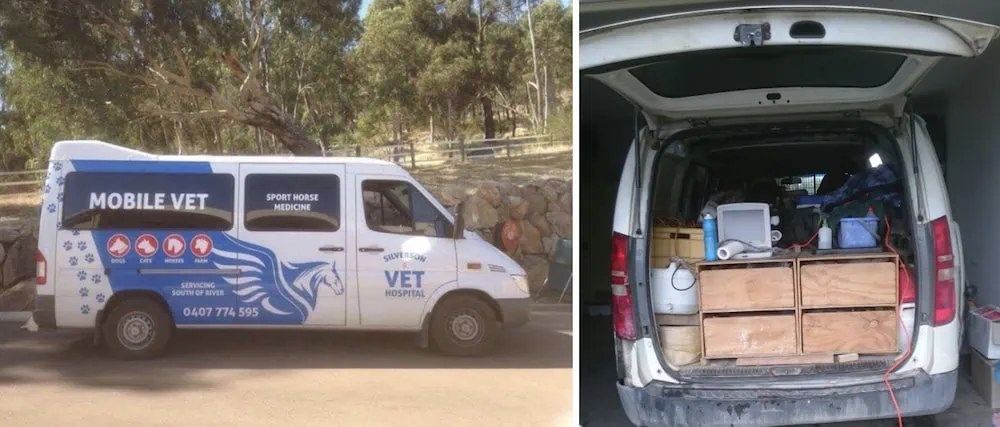
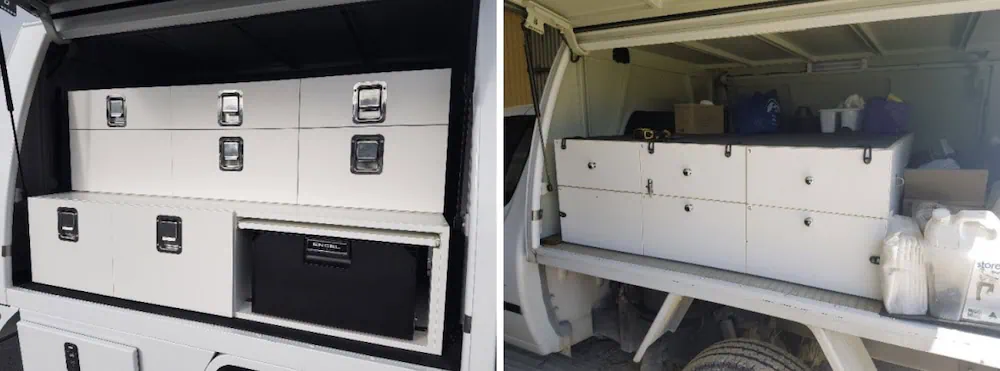
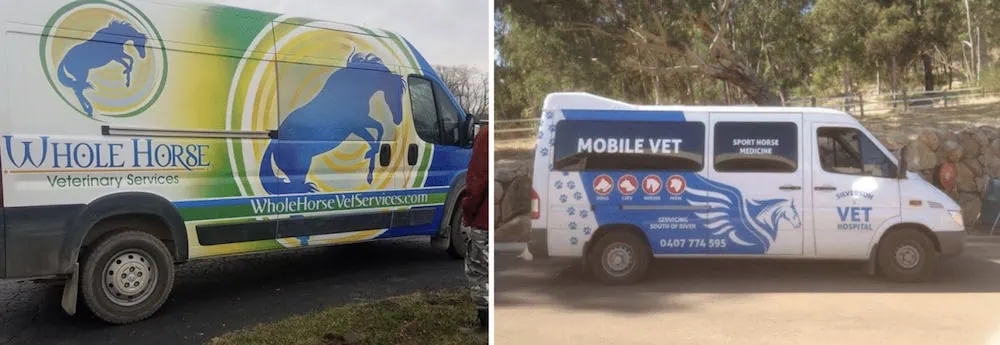
A converted ambulance (left) is a very unique option for a work vehicle, and doesn’t present itself often. They can
also make a great mixed/small animal ambulatory-only vehicle, where examination and laboratory space is required. Vans
(right) are also common, but lack functionality for non-veterinary uses and can be a logistical challenge to fit-out practically.
Van or converted ambulance
Vans provide substantial internal volume and can suit practices that require examination, laboratory or extensive equipment space. A converted ambulance can come with useful cabinetry, power and lighting already installed.
The trade-off is that these are generally dedicated work vehicles. Internal access needs careful planning so staff are not climbing into a crowded space or reaching past equipment. Long drawers and deep shelves can swallow supplies that are rarely seen again until they expire.
Quick comparison
| Vehicle type | Main advantages | Common limitations | Often suits |
|---|---|---|---|
| SUV | Comfortable, easy to drive, possible family use | Limited clinical space and poor separation of clean and dirty gear | Lighter inventories and clinicians balancing work with personal use |
| Ute or pickup with canopy | Four-wheel-drive options, towing, cabin separated from equipment | Tray sides and deep spaces can restrict access | Mixed or production animal work and moderate fit-out budgets |
| Ute or pickup with custom box | Highly organised, secure and purpose-built | Higher initial cost and requires detailed planning | Busy ambulatory equine or large animal practices |
| Van or converted ambulance | Maximum internal volume and potential clinic workspace | Usually work-only, with possible access and weight problems | Mobile practices needing substantial equipment or internal work areas |
Map the Workflow Before Building the Fit-Out
Once you have chosen the vehicle type, resist the urge to order drawers immediately. First, map what happens during a typical call.
Frequently used items should be accessible without unloading other equipment or walking around the vehicle repeatedly. Emergency drugs and common consumables need a consistent home. Heavy items should be positioned with safe lifting and vehicle weight distribution in mind. Dirty equipment should not travel through clean storage.
I find it useful to divide the vehicle into zones:
- Daily access: syringes, needles, commonly used medications, bandaging material and basic examination equipment.
- Diagnostics: radiography, ultrasonography, endoscopy and associated protective equipment.
- Procedure kits: dentistry, castration, wound repair, reproduction and other service-specific equipment.
- Temperature-controlled storage: vaccines, medications and samples requiring refrigeration.
- Dirty storage: nasogastric tubes, obstetrical gear, used instruments and equipment awaiting cleaning.
- Waste: general waste and an approved sharps container.
- Office: tablet or laptop, printer if required, payment terminal and charging points.
The physical fit-out should also support the veterinary software used by your equine practice, particularly when you need mobile records, diagnostic images, invoicing and offline access in the field.
Mock up these zones with boxes or tape before the final fit-out. Open every proposed door and drawer. Pretend to complete an invoice, prepare a sterile kit and return dirty equipment after a call. Ten minutes of awkward role-play can reveal problems that are difficult to fix once the cabinetry is installed.
Your vehicle layout is also part of your wider equine veterinary practice management system. Consistent storage, restocking and equipment-checking processes make it easier for every veterinarian to work efficiently.
Drawers: Smaller Is Often Better
Drawers determine whether a vet truck feels organised or chaotic.
Generic tool drawers can be a practical starting point, especially in an SUV or standard canopy. Measure carefully. Boot curves, door hinges and wheel arches have ruined many apparently perfect plans. Generic drawers will also need dividers suitable for veterinary supplies and positive latches that remain closed on rough roads.
Veterinary-specific or fully custom drawers make better use of available space. I prefer several appropriately sized drawers over one or two very long drawers. Large drawers encourage overfilling, become heavy and place greater strain on runners.
Whatever system you choose, check:
- the load rating of the drawers and runners
- the strength and cleanability of the drawer bases
- whether dividers can be moved as stock changes
- whether liquids can be contained and cleaned after a spill
- whether every drawer latches automatically when pushed shut
- whether labels can be read in low light
- whether high-use items are accessible from a neutral working position
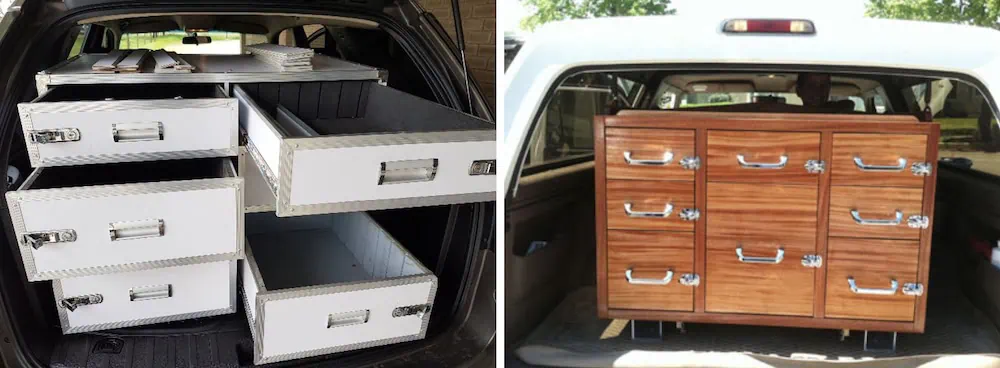
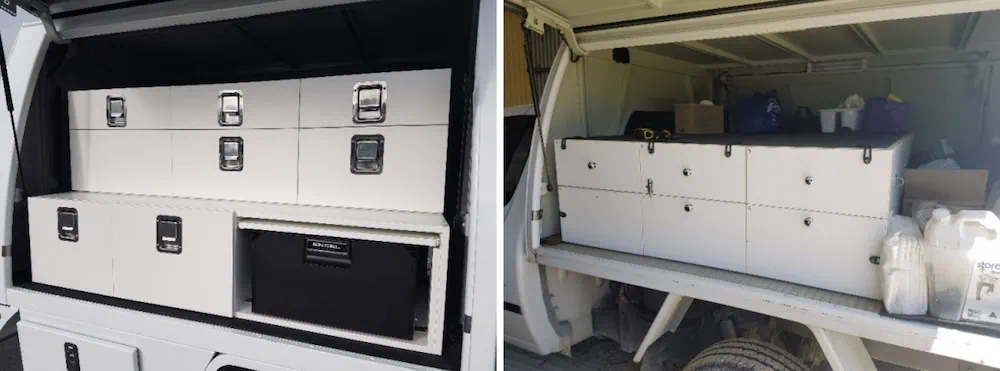
The semi-custom drawers on the left were in a work vehicle of mine. They were made by an equine dental company
in the UK, and each drawer had dividers that could be added to hold items. Robust and clean, they had two downsides; 1)
there was no room for anything else in the back, and 2) the drawers didn’t self-latch, meaning you still had to pull over and
shut them when you forgot. The wooden drawers on the right look fantastic, but they add a huge amount of weight to the
vehicle, even before filling them with stuff. Units such as the one pictured, that can be picked up with forks (tractor/forklift)
which make converting the vehicle from work to personal use a lot simpler.
Do not underestimate the latches
A drawer that slides open as you leave a property is funny once. After the fiftieth time, it becomes a design failure.
Self-latching hardware should be treated as essential. Test it on a slope and consider how vibration will affect vertical bolts or manual catches. A latch is a small part of the budget, but it has an unreasonable influence on how much you enjoy the finished vehicle.
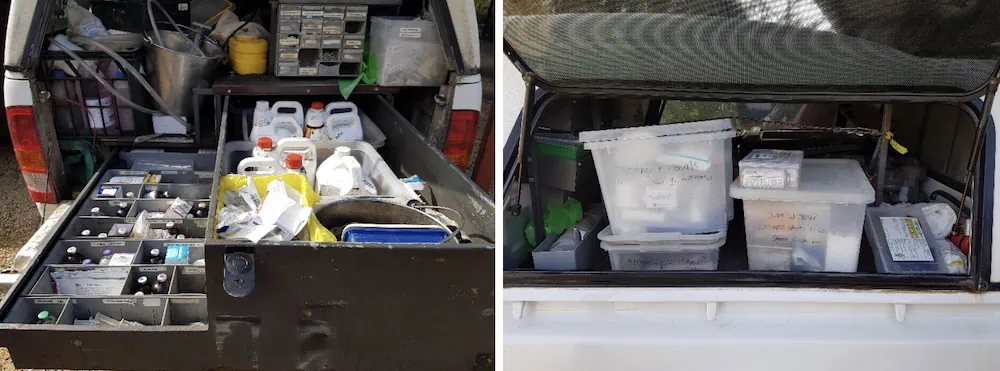
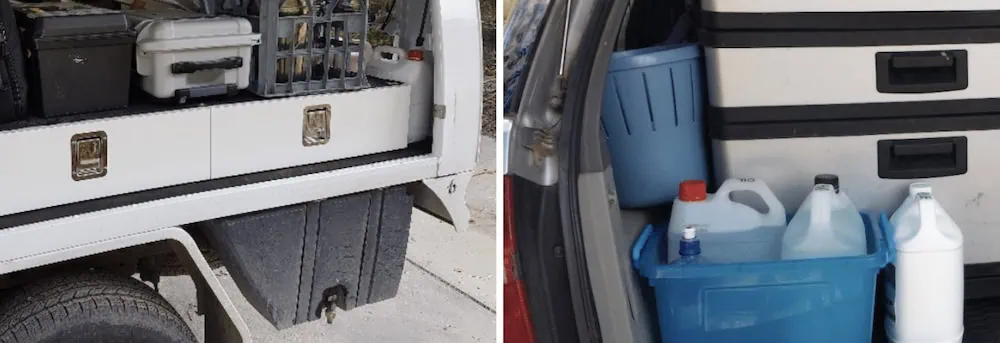
Ute-canopies are a common sight in production animal clinics. The tray sides however limit the functional access
to the back, usually resulting in one long drawer accessed from the back. These drawers are prone to breaking from over
packing. The side windows provide access to the top, but there usually ends up being a no-mans-land of lost things in the
middle of the canopy.
Include a Proper Work Surface
Even if most of your work occurs in a paddock or stable, you still need a clean, stable surface. You may be preparing equipment, labelling samples, setting up a sterile kit, entering records or taking payment.
A drawer top can work if it is at a comfortable height and fitted with a cleanable, non-slip surface. A pull-out bench is even better when space permits. It should lock securely in both the open and closed positions and remain stable when the vehicle is parked on imperfect ground.
Keep the clean work area away from the waste bin, sharps container and dirty-equipment compartment. If one surface must serve several purposes, establish a cleaning process and keep the required disinfectant immediately accessible.
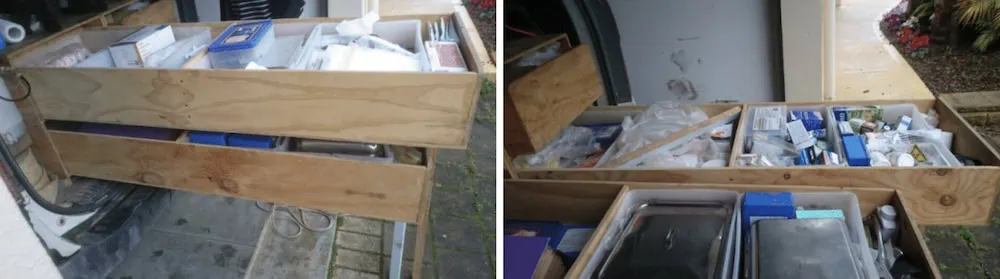
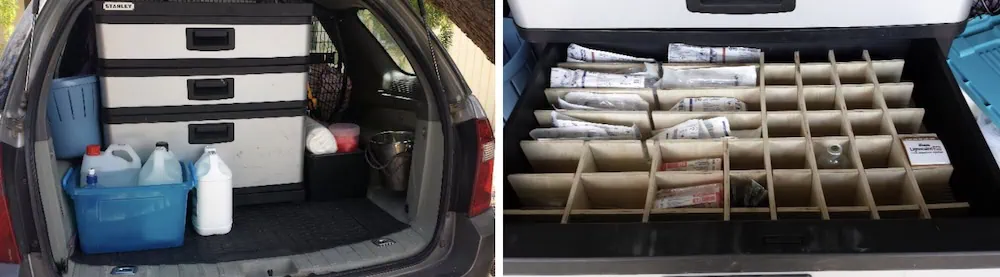
image on the left. Imagine having to put them up each time you want some medication or bandage material. Less commonly used things often drift to the back of these drawers and are more prone to going out of date or being lost altogether.
Plan for Waste and Sharps
Waste is easy to forget during the design stage and impossible to ignore once the vehicle is in use.
Give general waste a dedicated, lined and covered container. Position an approved sharps container nearby so needles can be disposed of immediately rather than carried across the vehicle. Both need to stay closed while travelling over corrugated roads or rough farm tracks.
Your waste arrangement should reflect the materials generated by your caseload and the disposal rules in your jurisdiction. It should also be simple enough that every person using the vehicle follows the same process.
Separate Long and Dirty Equipment
Nasogastric tubes, obstetrical equipment, fetotomy gear, dental stands and crutches are difficult to store because they are long, dirty or both.
A separate full-length drawer or external compartment keeps these items away from medications and diagnostic equipment. It should be easy to clean and should not drain contamination into another part of the fit-out.
If you are working from an SUV, a removable, washable cargo liner beneath the drawer system can contain small spills. Install it before the drawers. Removing a fully stocked unit later is an excellent way to lose an afternoon.
Think beyond convenience here. A clearly separated dirty zone supports a more consistent cleaning and biosecurity routine between calls.
Water, Fluids and Spill Control
Water is useful for hand hygiene, equipment cleaning, mouth rinsing and surgical preparation. A purpose-built vehicle may carry a fixed tank with a pump, while an SUV or smaller canopy may be better suited to secure, removable containers.
The right volume depends on your work and the opportunities to refill. More water also means more weight, so include a full tank in the payload calculation.
Bulk fluids such as liquid paraffin need secure, upright storage and a plan for leaks. Use compatible containers, secondary containment and accessible taps where appropriate. A small spill tray is cheaper than replacing contaminated cabinetry.
Refrigeration and Medication Temperature
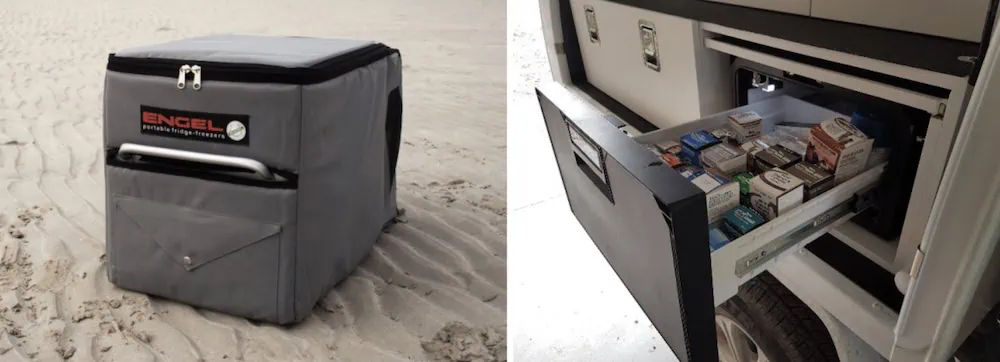
A powered refrigerator should be considered part of the clinical fit-out when you routinely carry products that require refrigeration. An ice box or cooler may be useful for short periods, but it depends on someone remembering to replace the cold packs and does not provide the same level of control.
Vehicle storage can become much hotter than the outside air. A study of temperatures inside large animal veterinary practice vehicles found that drug storage areas exceeded labelled storage temperatures for a significant proportion of the summer monitoring period. The highest recorded temperatures in the study were well above normal controlled-room-temperature limits.
A reliable system may include:
- a refrigerator sized to the actual medication volume
- a dedicated electrical supply appropriate for the vehicle
- temperature monitoring rather than relying on how cold the fridge feels
- alerts or a documented check process for power failures and excursions
- a plan for overnight, weekend and vehicle-servicing periods
- storage that follows each product’s label and local professional guidance
A drawer refrigerator can use space more efficiently than a top-opening camping fridge because equipment can be stored above it. Whatever style you choose, confirm ventilation, power demand, mounting and access with the installer.
Good temperature control, stock rotation and equipment care also reduce medication wastage and support a more sustainable equine veterinary practice.
Protect Radiography Equipment and Gowns
Radiography equipment is expensive, heavy and frequently relegated to the back seat. It needs a defined position with suitable restraint so that it does not move during travel or become a risk in sudden braking.
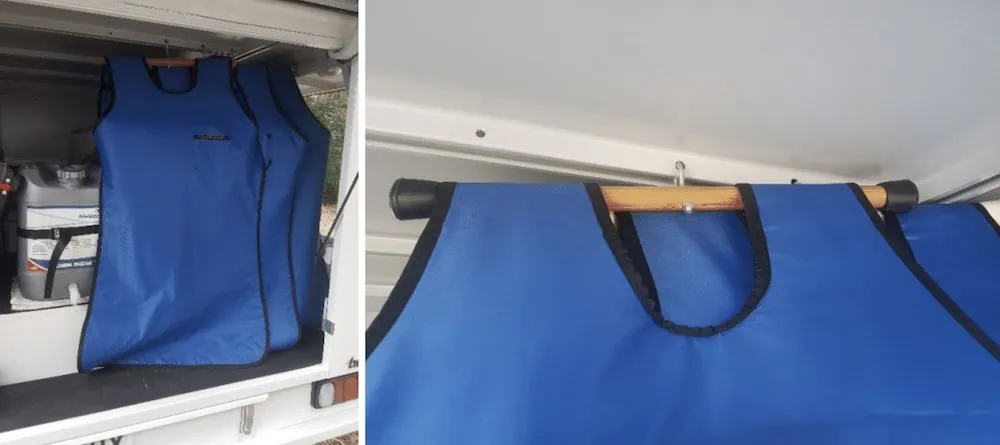
Protective gowns should not be folded or crushed. Provide a broad, strong hanger or other storage system recommended by the manufacturer so the protective material is properly supported. The hanger and its mount must be capable of carrying the gown’s weight on rough roads.
Include gown storage early in the design. It is much harder to find suitable hanging space after every wall and drawer has been allocated.
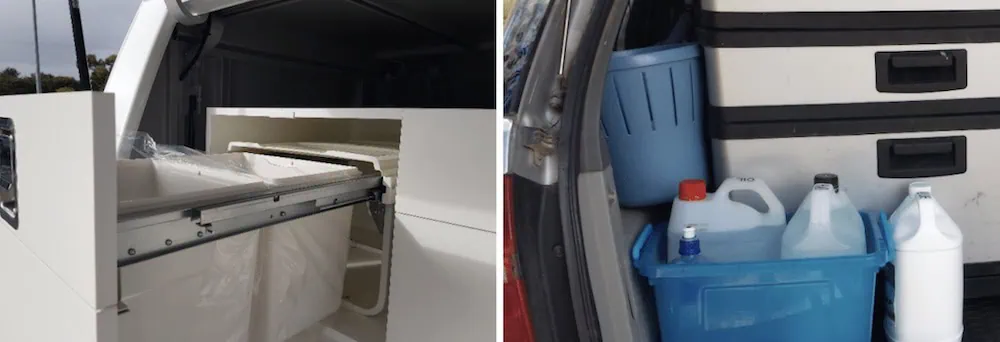
close proximity, for waste and sharps help to speed clean-up. Covers also stop things from coming back to haunt you when travelling on corrugated roads. Smaller bins such as the one on the right can be good to tuck into tight spaces, but always remember to use a bin liner.
Lighting, Charging and Power
At night, good lighting is a clinical safety feature, not a decorative extra.
LED lights inside compartments make labels and equipment easier to identify. External work lights can help illuminate a preparation area, although they must be positioned so they do not blind the veterinarian or create unhelpful glare.
List every device that needs charging or continuous power, including:
- refrigerator
- tablet or laptop
- mobile phone
- payment terminal
- radiography and ultrasound equipment
- printer, if used
- internal and external lighting
Ask an appropriately qualified installer to design the electrical system, battery protection and charging arrangement. Loose adaptors and an overloaded socket are not a power plan.
Security and Controlled Medicines
Veterinary vehicles can contain valuable equipment and medicines that are attractive to thieves. Vehicle design should make access difficult, limit what can be seen from outside and allow staff to lock the clinical area without checking numerous separate catches.
A custom box without windows generally provides more physical separation than the cabin of an SUV or van. Central locking can improve day-to-day use, but an independent mechanical lock may provide useful redundancy. Alarms, immobilisers and tracking should also be considered in the context of the vehicle’s value and local risk.
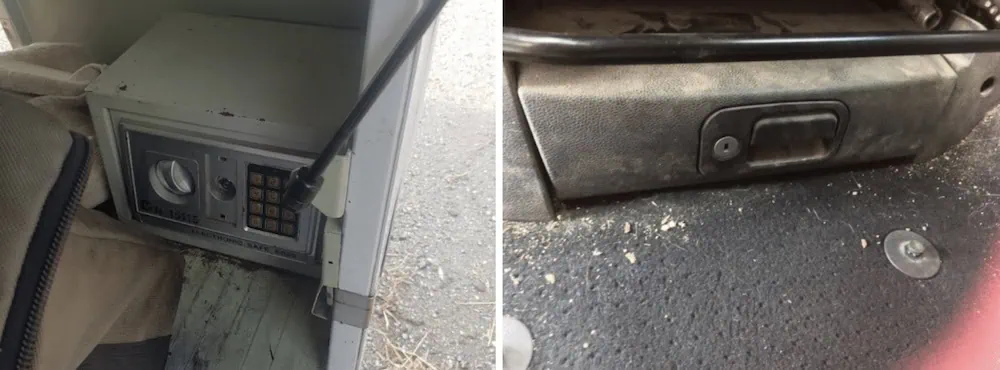
Controlled-medicine requirements differ between countries and, in some places, between states or provinces. Do not copy another practice’s setup and assume it is compliant. Confirm the current rules that apply to possession, transport, storage, access and records in every jurisdiction where the vehicle operates.
At a practical level, the storage must be secure, fixed where required, accessible enough that the veterinarian will use it correctly and restricted to authorised personnel. Build the compliant solution into the fit-out rather than trying to hide a safe wherever space remains.
Should You Put Signage on the Vehicle?
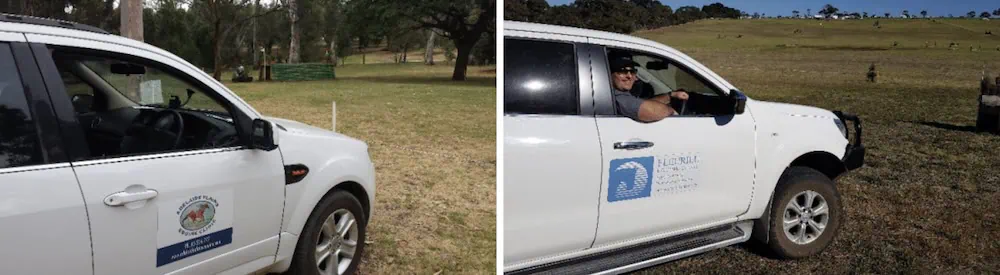
Vehicle signage turns every trip into practice advertising and helps clients recognise who has arrived. It can also announce that the vehicle may contain medications and valuable equipment.
The decision depends on ownership, security and how the vehicle is used outside work.
Magnetic signs
Magnets are inexpensive and removable, but my experience with them was poor. Dust and dirt reduced their reliability, and once one left the vehicle, it was rarely seen again. If you use magnets, confirm their suitability for the body panels and conditions in which you drive.
Window graphics
Perforated window graphics can work well on SUVs and canopies. Check that they comply with visibility and vehicle regulations and do not interfere with safe driving.
Vinyl lettering
Vinyl lettering provides clear branding without the cost or visual complexity of a full wrap. It is often the practical middle ground for a dedicated practice vehicle.
Full vehicle wrap
A full wrap creates the greatest visual impact and protects some of the underlying paint, but it requires more design work and a larger budget. If you choose this option, use the same brand system as the rest of the practice and keep important information readable at a glance.
Whichever option you select, review the security plan at the same time.
Could Portable Equine Stocks Change the Setup?
Portable stocks can change what the vehicle itself needs to carry. A purpose-built trailer may provide restraint, water, lighting, power and additional storage for dentistry, reproduction, gastroscopy, ultrasonography and standing procedures.
For some practices, this allows the tow vehicle to remain simpler and more useful outside work. It may also improve consistency when procedures are performed at facilities without suitable stocks.
The decision needs to account for towing capacity, licensing, storage, insurance, maintenance, setup time and the types of calls for which the stocks will genuinely be used. The vehicle and trailer should be planned as one working system, not purchased independently and forced together later.
Equine Vet Truck Setup Checklist
Before approving a vehicle or fit-out, confirm that you have considered:
- vehicle payload, axle loads and towing requirements
- terrain, ground clearance and four-wheel-drive needs
- driver comfort and ease of entry and exit
- seating for an assistant, technician or student
- secure restraint for heavy diagnostic equipment
- short, load-rated drawers with self-latching hardware
- daily-use storage accessible without unloading other gear
- a clean preparation and administrative work surface
- separate dirty and long-equipment storage
- lined general-waste and approved sharps containers
- water capacity and spill containment
- powered, monitored medication refrigeration where required
- medication storage that follows product labels
- compliant controlled-medicine storage and records
- correct storage for radiography protective equipment
- internal lighting, external work lighting and device charging
- locks, alarms, tracking and visibility of valuable items
- signage balanced against security and personal use
- cleaning, stock rotation and expiry-checking procedures
- whether portable stocks or another trailer will be part of the system
Frequently Asked Questions
What is the best vehicle for an equine veterinarian?
The best vehicle depends on caseload, terrain, equipment, driving distance, towing needs and whether the vehicle will also be used personally. An SUV may suit a veterinarian with a lean inventory, while a ute or pickup with a custom veterinary box generally provides better storage, security and separation for a busy ambulatory equine practice.
How should I organise an equine vet truck?
Organise the vehicle around workflow. Keep frequently used items easy to reach, assign permanent locations to emergency drugs and common consumables, secure heavy equipment and separate clean supplies, refrigerated medicines, dirty equipment, waste and sharps. Several smaller drawers are usually easier to manage than one very long drawer.
What should an ambulatory veterinary vehicle include?
The exact inventory is practice-specific, but the fit-out commonly needs secure drawers, a clean work surface, waste and sharps storage, refrigeration where required, water, lighting, charging, diagnostic-equipment restraint, dirty-equipment storage and compliant controlled-medicine security.
Can an SUV work as an equine vet vehicle?
Yes. An SUV can be comfortable, economical and suitable for mixed personal use. Its limitations are space, equipment restraint and separation of clean and dirty items. A carefully selected drawer unit, a controlled inventory and dedicated storage for larger diagnostic equipment are essential.
How should medications be stored in a veterinary vehicle?
Follow each product’s labelled storage conditions and the current rules in your jurisdiction. Temperature-sensitive products may require powered refrigeration and temperature monitoring. Controlled medicines require secure storage, restricted access and appropriate records. Because vehicle temperatures can become extreme, do not assume an unmonitored drawer or cooler remains within the required range.
Build the Vehicle Around the Way You Practise
A well-designed equine vet truck will not make a difficult call easy, but it will remove avoidable friction from almost every day. You will spend less time searching, lifting, rearranging and cleaning around poor design. Medications and equipment will be easier to protect, and a consistent layout will help anyone sharing the vehicle work more efficiently.
Treat the vehicle as a core piece of clinical equipment. Start with the work it must support, design the storage around real workflows and pay attention to the small details, especially the latches. Those are the decisions you will notice long after the excitement of buying the vehicle has passed.